A healthy smile starts with strong, natural teeth. However, when a tooth becomes severely decayed or infected, saving it becomes a priority. Instead of extraction, a root canal procedure can effectively restore the tooth’s function and protect your oral health. This treatment removes infection, relieves pain, and prevents further complications. Here’s a step-by-step guide to understanding how a root canal procedure works and why it is crucial for preserving your natural teeth.
Read More: How to Tell If You Have Mild Tooth Infection: Early Detection Tips
Step 1: Diagnosis and Evaluation
The first step in the root canal procedure involves a thorough dental examination. Your dentist will take X-rays to assess the extent of damage and determine if the tooth’s pulp is infected.
Symptoms such as persistent pain, sensitivity to hot and cold, and swelling around the tooth indicate the need for a root canal. Based on the evaluation, the dentist will confirm whether the procedure is necessary to prevent the infection from spreading.
Step 2: Administration of Local Anesthesia
To ensure a comfortable experience, the dentist will numb the affected tooth and surrounding area with local anesthesia. This step eliminates pain, allowing for a smooth and pain-free treatment. Many patients worry about discomfort, but modern dental techniques have made the root canal procedure as comfortable as getting a regular filling.
The numbness typically lasts for a few hours, preventing any pain during and immediately after the procedure. Patients can also discuss sedation options with their dentist if they experience dental anxiety.
Read More: Bleeding Gums After Root Canal – Is It Normal?
Step 3: Accessing the Pulp Chamber
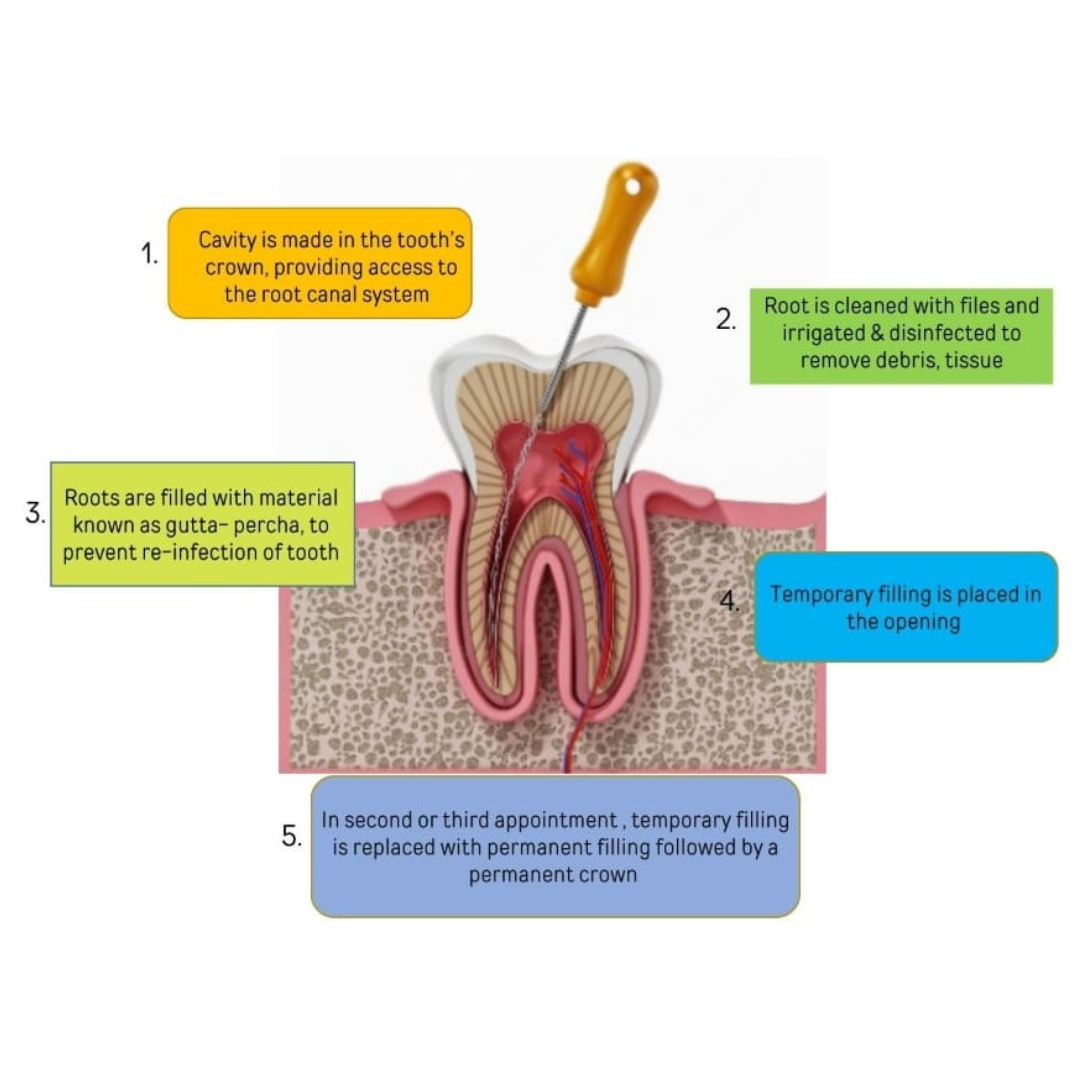
Once the area is numb, the dentist creates a small opening in the tooth to access the infected pulp. This step requires precision to remove the damaged tissue without affecting the tooth structure. Specialized tools are used to carefully clear out bacteria and dead pulp, ensuring the infection does not spread further.
The dentist also flushes the area with an antiseptic solution to eliminate any remaining bacteria. This thorough cleaning process helps prepare the tooth for the next step of the procedure.
Read More: Root Canal or Implant – Which One Lasts Longer?
Step 4: Cleaning and Shaping the Root Canals
After the infected pulp is removed, the dentist cleans and disinfects the root canals thoroughly. This step is crucial for eliminating bacteria and preventing reinfection. The canals are then shaped to prepare them for filling. Proper cleaning and shaping ensure that the tooth remains strong and stable after the procedure.
A special antimicrobial solution is used to flush out any remaining bacteria. This ensures the canals are completely sterilized before sealing.
Step 5: Filling and Sealing the Tooth
The final step involves sealing the cleaned root canals with a biocompatible material called gutta-percha. This prevents bacteria from re-entering and causing future infections. To protect the tooth, a temporary or permanent filling is placed. In most cases, a dental crown is recommended to restore the tooth’s strength and function, ensuring long-term durability.
This final restoration helps the tooth blend naturally with the rest of your smile, providing both aesthetic and functional benefits. With proper care and regular dental check-ups, a treated tooth can last a lifetime.
Read More: Can a Root Canal Cause Bad Breath? Understanding the Facts
SmileStudio: Your Partner in Pain-Free Dental Care
A root canal procedure is a highly effective way to save a damaged or infected tooth. By removing the infection and sealing the tooth, this treatment restores oral health and prevents the need for extraction. If you’re experiencing tooth pain or sensitivity, don’t wait—schedule a consultation with SmileStudio today. Our expert team in Boston is dedicated to providing top-quality care and ensuring a pain-free experience.
Contact SmileStudio Today!
📞 Call Us: +1 (617) 265-5606
📧 Email Us: smilestudioboston@gmail.com
🌐 Visit Our Website: https://smilestudioboston.com/
📍 Find Us: 1428 Dorchester Ave, Dorchester, MA 02122, United States
Don’t let tooth pain take over your life—trust SmileStudio for expert care and lasting results!
FAQs
Q. What is the most common tooth for a root canal?
Molars, especially the first molars, are most commonly treated because they handle the most chewing pressure.
Q. How long do root canals take to heal?
Most discomfort subsides within a few days, but full healing can take a few weeks. Proper oral care speeds up recovery.
Q. Which tooth is most difficult for the root canal?
Upper molars are the most challenging due to their multiple roots and complex anatomy, requiring more precision.
Q. What is the hardest layer of the tooth?
Enamel is the hardest and most mineralized layer, protecting the inner tooth from decay and damage.
Q. What are root canal side effects?
Mild pain, swelling, and sensitivity are common but temporary. Proper care helps minimize discomfort.
Q. Is an antibiotic necessary after a root canal?
Antibiotics are only prescribed if there’s an infection or swelling that needs further treatment.
